User management
By default, every mquery user enjoys full admin rights. This is useful for trying it out, and for locked down or small deployments. But for larger multi-user deplotments, it may be useful to restrict what users can do by default.
Optional user management in mquery is role-based, and handled by OIDC.
Role-based permissions
There are three predefined permission sets that can be assigned to users:
admin: has access to everything, including management features. Can change the service configuration, manage datasets, etc. Users withadminrole can do everythingusers can.user: has access to the analyst features. Can create new search jobs, see and cancel every job, and download matched files. In current version, users can see and browse all jobs in the system.nobody: empty role that gives no access to anything. Useful for anonymous users.
Role names are considered stable, and will continue to work in the future.
User permissions are then split into more fine-grained permissions:
can_view_queries: Can view the query and matched files with a given query ID.can_manage_queries: Can create, stop, and delete queries.can_list_queries: Can list queries (for “recent jobs” tab).can_download_files: Can download matched file contents.
It’s possible to assign some of these roles directly (instead of giving the
user role), but they’re currently not considered stable and
may change in some future new version.
(Note: in the current version there is no isolation between users, and users can view/stop/delete each other queries. This may change in the future)
OIDC quickstart
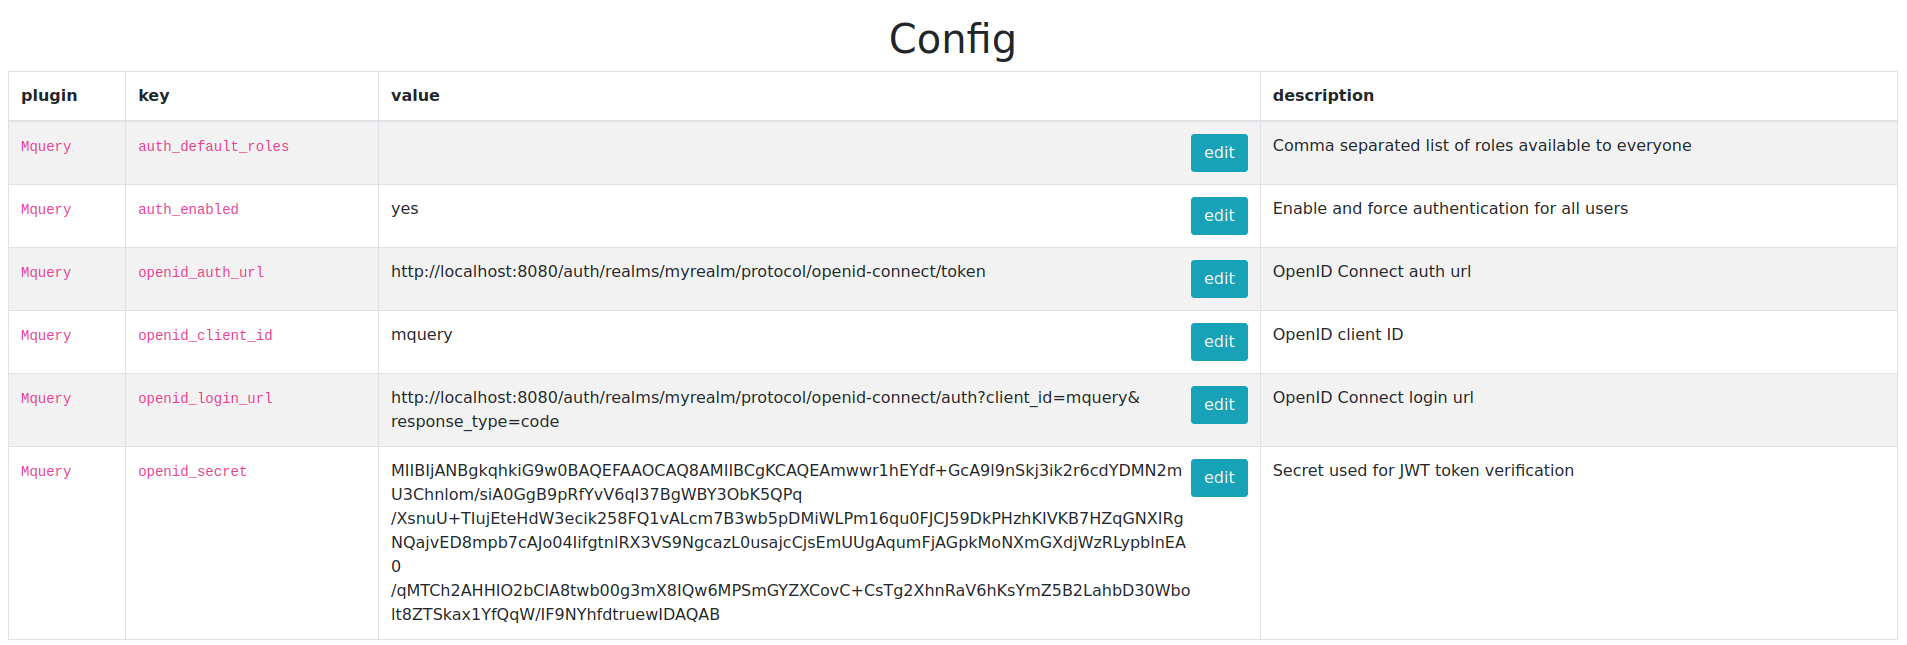
In the /config section set:
auth_default_rolesto “nobody” or “user” (this is a role for anonymous users)openid_client_id,openid_url,openid_secretas required for your OIDC server (secret should be a RS256 key)auth_enabledto “true” (to this last, to avoid locking yourself out).
If something goes wrong, you need to manually fix the config in the database
(to disable auth: delete from configentry where key='auth_enabled').
OIDC integration
Mquery doesn’t implement user management. Instead, this is delegated to an external system, and authentication is handled via OpenID Connect.
Roles are granted to users by JWT tokens via OIDC, using the
resource_access key. For example, token that grants admin role
in the mquery client may look like this:
{
  "exp": 1643215666,
  "iat": 1643215366,
  "auth_time": 1643215365,
  "jti": "d82332f7-d22c-45ff-a6dd-cb33fc1526a3",
  "sid": "4c9f8999-dcb3-48b3-a7ef-aad4cf44f518",
  "iss": "http://localhost:8080/auth/realms/myrealm",
  "aud": "account",
  "sub": "f7ddae72-63e8-4233-a83b-699643761a6e",
  "typ": "Bearer",
  "azp": "mquery",
  "session_state": "4c9f8999-dcb3-48b3-a7ef-aad4cf44f518",
  "acr": "1",
  "realm_access": {
    "roles": [
      "default-roles-myrealm",
      "offline_access",
      "uma_authorization"
    ]
  },
  "resource_access": {
    "mquery": {
      "roles": [
        "admin",
        "user"
      ]
    }
  },
  "scope": "email profile",
  "email_verified": false,
  "preferred_username": "msm"
}
Token generation is handled by the OIDC software automatically. Administrators just have to assign appropriate permissions and groups to the allowed users.
Step-by-step Configuration
In this section we will go over configuration using Keycloak - open source identity management solution. In principle, it should work with any other OIDC-capable system.
We assume that mquery is hosted at http://localhost,
and Keycloak is hosted at http://localhost:8080. Change the URLs
as necessary for your deployment.
Warning the proces is tricky, and right now it’s missing a proper validation.
It’s possible to lock yourself out (by enabling auth before configuring it
correctly). If you do this, you have to disable auth manually, by running
redis-cli (sudo docker compose exec postgres psql -U postgres --dbname mquery for docker) and
executing delete from configentry where key='auth_enabled';.
Step 0 (optional): enable auth in non-enforcing mode
- Go to the
configpage in mquery (http://localhost/config). Setauth_default_rolestoadmin - Set
auth_enabledtotrue
Step 1: configure keycloak
- Go to the Keycloak’s admin console (http://localhost:8080/auth/admin/master/console/) and login (default credentials are admin:admin).
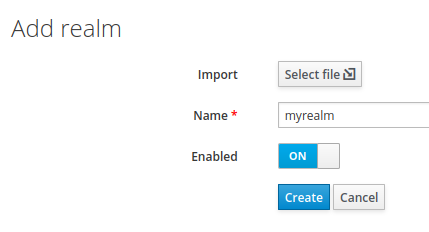
- Click “Add realm” on the left and create a new realm in Keycloak. Let’s call it
myrealm:
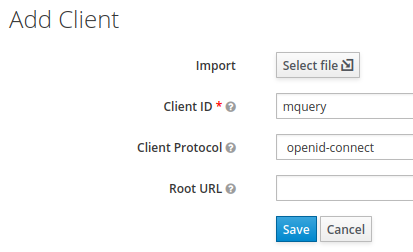
- Add a client to the realm, let’s call it
mquery:
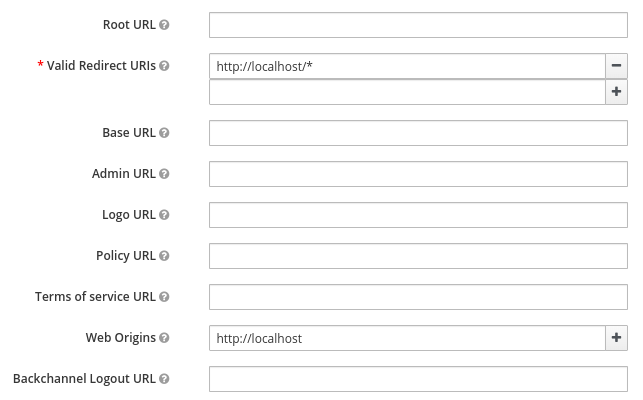
- Edit the client, and set
Valid Redirect URIstohttp://localhost/*(orhttp://[mquery_url]/*) andWeb Originstohttp://localhost(orhttp://[mquery_url]).
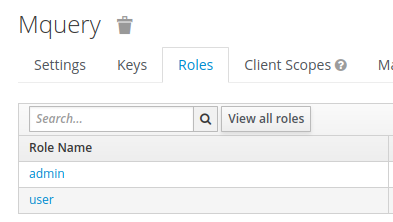
- Go to the
rolessubpage in the client, and addadminanduserroles.
- Create a new user in your realm. Let’s call them
john:
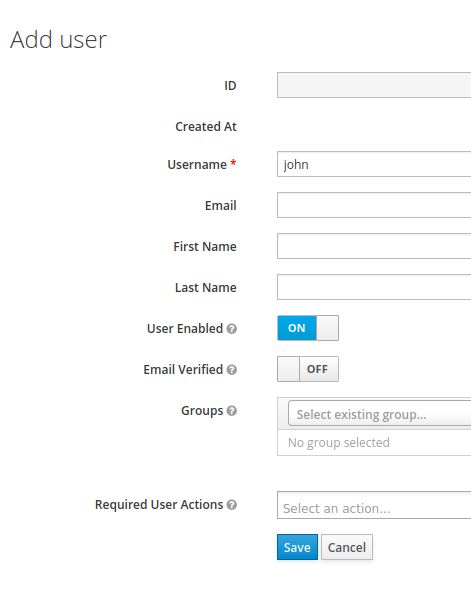
-
Edit the user. In
Credentialsadd a new password for the user. -
In
Role mappings, selectmqueryclient in theclient rolesand grant appropriate roles to the user (remember to grant yourself an admin role! You can have bothadminanduserroles).
Step 2: configure mquery
Go back to the config page again (http://localhost/config).
- Set
openid_urltohttp://localhost:8080/auth/realms/myrealm/protocol/openid-connect - Set
openid_client_idtomquery(client idfrom the step 1) - Set
openid_secretto theRS256public key of your realm. Get it fromhttp://localhost:8080/auth/admin/master/console/#/realms/myrealm/keys(configure -> realm settings -> public key)
Step 3: enable auth in enforcing mode
- Go to the
configpage in mquery. Changeauth_default_rolesto “user” or “nobody”, depending on your needs. - Don’t leave
auth_default_rolesempty, for compatibility reasons this gives admin permissions for every user. - Set
auth_enabledtotrue
Final result:
Step 4: reload and done
Reload the page. You should be redirected to your login page. Enter the password you’ve configured, and if everything was set-up correctly, you should be back as a logged in user.